Restore the Windows Defragmenter
(Windows XP / 2000 / 2003)

I've seen on several computers where the built in Disk Defragmenter not longer runs correctly. This often happens when you install a third party defragmenter like Diskeeper, then on uninstalling, it does not restore the built in one correctly.
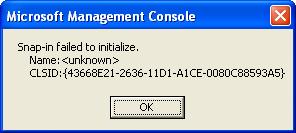
 Some of the problems you may encounter are, a box like the one shown here
Snap-in failed to initialize,
CLSID: {43668E21-2636-11D1-A1CE-0080C88593A5}
when you try to run windows defrag, or other times, the defrag window will show up, but the analyze and defragment buttons will do nothing.
Solution
The solution is actually quite simple. You need to re-register the defragmenters snap-in files, and the basic registry entries.
-
First open up a Command Prompt, this can be found at:
Start -> All Programs -> Accessories -> Command Prompt
-
Change into your windows\system32 directory. Your windows directory will be either windows or winnt. Type:
cd \windows\system32
-
Register the defrag components, by typing:
regsvr32 dfrgsnap.dll
regsvr32 dfrgui.dll

-
At this stage, you may find the defragmenter works. If not, there is one more step you can do.
Using Windows Explorer browse to your windows\inf folder.
In there you will find a file called dfrg.inf right click this file, and select Install.
-
Done!
UPDATE (21 July 2006):
John B left a comment below that is helping a lot of people, I've copied it up here to make it easy to find. Basically, make sure you have a paging file.
Anyone getting the "Disk Defragmenter Could not start" message and on Windows XP Home This is what worked for me. Go to Control Panel, Select System and select the Advance Tab. Now Select Settings Under Performance and again select the advance tab. Under Virtual Memory select Change. Make sure that the Paging File Size for selected Drive for the Drive partition you want to Defrag has either a custom at least 2 times the amount of installed RAM if the space is available or is set to System Managed Size. Once I did this Defrag started working again. I don't know how the Page file got turned off on my system but this has been driving me mad for months!! Hope it helps someone else out there !!!
John B :)